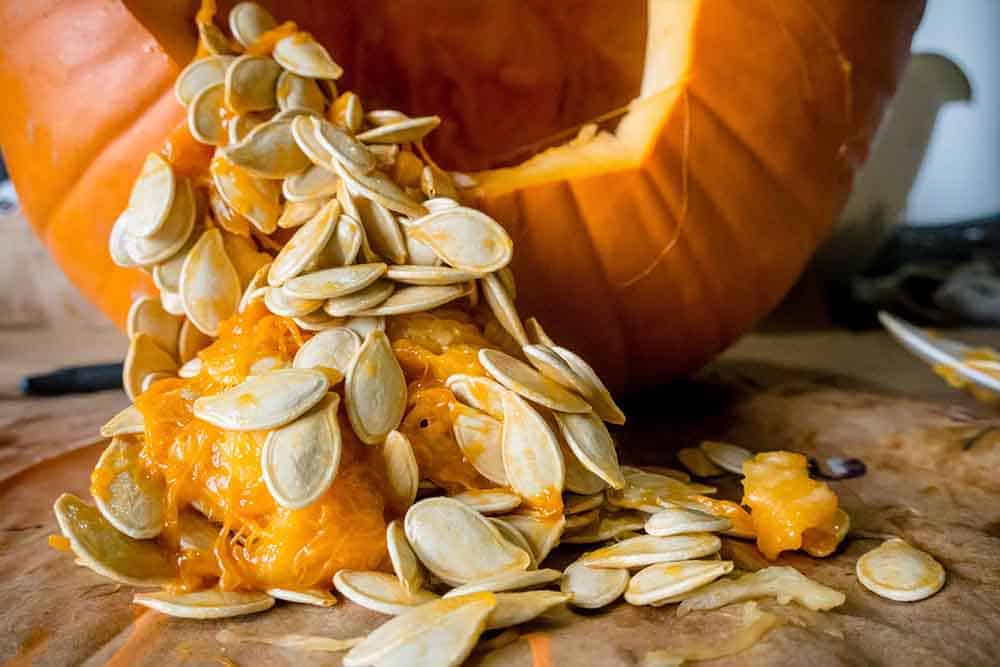
How to Separate Pumpkin Seeds from Strings

About the Author: Jeremy Starke
I've been growing vegetables since I was 12 — over 30 years in the dirt. I share what actually works in my own Zone 6b garden, and what I wish someone had told me when I started.
Zone 6b · North Carolina · Gardening since age 12How to Separate Pumpkin Seeds from Strings
If Halloween is celebrated in your area, then chances are that you’ve tried roasted pumpkin seeds.
This is a favorite Halloween treat for many people. My 2 girls and I love carving pumpkins and eating pumpkin seeds. We love to roast the pumpkin seeds to eat as it makes for a great healthy snack.
You might be wondering if there is a good method on how to separate pumpkin seeds from strings.
How do you deal with that mess of pumpkin seeds and pulp to get those seeds for a delicious snack? Well, that’s a thing that we’ve also wondered about long ago. But now, knowing the secret (not really), we want to share with you how to separate pumpkin seeds from strings!
2 Easy Ways to Separate Pumpkin Seeds from Strings
As a parent of 2 young girls, it is imperative that I offer at least 2 ways to do this. The first is a tried and true method that your little ones can help you to do all by themselves while you finish gutting out the pumpkin.
You know, teamwork at its best. The second method is if you want to take it up a notch. It involves boiling water, so you will definitely need to help the little kiddos.
Method #1 to Separate Pumpkin Seeds
The step-by-step process is as follows:
- Pick a pumpkin, preferably a larger one from which you can harvest more seeds. If you are intending to make jack-o’-lanterns though, avoid overly big pumpkins that can collapse after being emptied.
- Cut around the top of the plant and remove the top.
- Use a spoon to scrape out the seeds along with the pulp into a bowl with water.
- Manually separate the seeds from the pulp. Focus on larger chunks of pulp just yet – you will be able to remove the rest later. Put the cleaned seeds into a colander as you go.
- Rinse the seeds in the colander under cool running water. Rub the seeds together to remove as much pulp as possible. You don’t really need to remove all of the pulp since it can improve the flavor of the dish.

- Once you’re satisfied with the result, thoroughly drain the seeds.
- Spread the seeds on a clean dish towel or a paper bag. Let the seeds air dry. You may use a hairdryer to speed up the drying process.
Method #2 to Separate Pumpkin Seeds
This method involves gently boiling them in salted water:
- Scoop out of the guts from the inside of the pumpkin as in the 1st method.
- Try and separate as much of the pulp as you can from the seeds but don’t worry too much if some of it remains on the seeds.
- Start to boil some water in a pot big enough to hold your seeds. You don’t want a rolling boil. Just as the water begins to boil is enough
- Add about 3 tablespoons of salt to the water as it boils and stir to help the salt dissolve
- Add in the pumpkin seeds and pulp & stir the mixture until you start to notice that the stringiness is falling off
This method is actually a good way to get some plump pumpkin seeds for roasting. You might think of it as a brining method that enhances the flavor and texture of ordinary pumpkin seeds.
Skip to step#5 if you want to roast your pumpkin seeds after you
Roasting pumpkin seeds
The ultimate goal of separating the seeds from the pulp is roasting the former, but how do you roast pumpkin seeds? Well, there are many recipes out there, but let us present one that we think you will like.
What you will need:
- Around 3-1/2 cups of fresh pumpkin seeds.
- 3-4 cups of water.
- Half a cup plus 2 tablespoons of sea salt.
- A bowl and a cookie sheet.
Roasting Directions:
- Pour all of the water and half a cup of sea salt into a bowl.
- Warm up the water in a microwave. 2-3 minutes should suffice.
- Stir the water to dissolve the salt as much as possible. If some salt remains in the bowl, do not worry, it won’t have a major impact.
- Pour in the pumpkin seeds. Let the seeds soak for at least 3 hours.
- Then, preheat your oven to 350 degrees. (Skip to this step if you did method#2 of separating pumpkin seeds from strings)
- Pour the pumpkin seeds into a colander. Let the seeds sit so that they get drained.
- Once the seeds have drained, spread them in a thin single layer over a cookie sheet.
- Sprinkle the remaining 2 tablespoons of sea salt over the seeds. Stir the seeds thoroughly.

- Put the cookie sheet in the oven. Depending on how many seeds you have or how large they are, bake them for 20-30 minutes.
- While baking, rotate the pan and flip the seeds with a spatula every 5 minutes.
- Bake until the seeds are dry. The shell of the seeds should retain its pale white color. Don’t allow them to brown.
This isn’t the only roasted pumpkin seed recipe in the world, but we think it’s good enough to get started. Then, feel free to add your own modifications or go for completely different recipes!

Meet Jeremy Starke
I've been growing vegetables since I was 12 — over 30 years in the dirt. I share what actually works in my own Zone 6b garden, and what I wish someone had told me when I started.
Zone 6b · North Carolina · Gardening since age 12 Read My Story →Frequently Asked Questions
How do you separate pumpkin seeds from the strings?
Scoop out the guts, then work the seeds free in a bowl of water. The seeds sink and the stringy pulp floats, so you can skim it off easily.
Should you wash pumpkin seeds before drying?
Yes. Rinse off all the pulp in a colander so the seeds dry cleanly and don't mold, whether you're saving them to plant or to roast.
How do you dry pumpkin seeds?
Spread them in a single layer on a towel or rack and let them air-dry for about a week. Fully dry seeds store and roast much better.