Why Vermicomposting Is Important [Epic Guide]
![Why Vermicomposting Is Important [Epic Guide]](/wp-content/uploads/2021/01/why-vermicomposting-is-important-00.jpg)

About the Author: Jeremy Starke
I've been growing vegetables since I was 12 — over 30 years in the dirt. I share what actually works in my own Zone 6b garden, and what I wish someone had told me when I started.
Zone 6b · North Carolina · Gardening since age 12I had been heaping organic waste in my backyard for several years. With the foul smell and mess that was spreading out in my backyard, the waste became a nuisance.
I knew I had to find a way to address the issue. After trying a few alternative disposal methods, I landed on one that had extra benefits. Read on to learn why vermicomposting is essential.
Why Vermicomposting Matters?
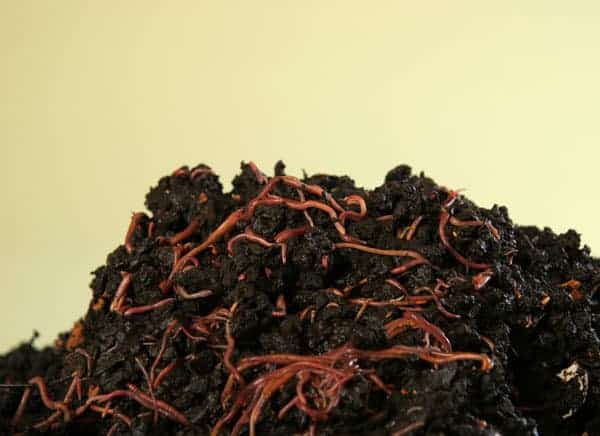
Vermicomposting is one of the composting methods that rely on various worm species such as red wigglers, white worms, and other earthworms in the process of decomposition. The end product from this worm activity is called vermicast.
These are the reasons why vermicomposting matters
- Vermicomposting is meant to change the soil's physical, chemical as well as biological properties. It positively impacts the soil structure, texture, and aeration through earthworm activities. The method also substantially prevents soil erosion.
- Vermicomposting is a vital component that encourages plant growth. Thanks to its ability to increase the macropore space that improves the relationship between air and water in the soil. The earthworms also excrete mucus, which produces antibiotics and biochemical excellent in boosting plant growth.
- Another reason you will find vermicomposting necessary is its impact on the soil pH, microbial population, and soil enzymes' activities.
This method also offers nutrients such as phosphates, nitrates, exchangeable calcium, and potassium.
- Besides, vermicomposting offers useful micro-flora such as P-solubilizers and N-fixers.
- Another reason you should consider vermicomposting is its ability to reduce water-soluble chemicals' proportion. This chemical poses a risk of environmental contamination.
- Additionally, vermicomposting can be considered as a slow-release fertilizer. It leaves a long-lasting positive impact on the soil structure and fertility, plant growth, as well as suppressing soil-borne disease.
Vermicompost Benefits
There are various benefits of vermicomposting. They include the following:
- Provides a better way of disposing of organic wastes
- Enriches the soil with nutrients
- Improves the soil structure
- It makes clay soil more efficient for crop growing by improving its aeration and drainage.
- It is a source of several beneficial microorganisms that break down organic matter, making it easy for plants to absorb the matter as nutrients.
- Worm castings can be used to reduce and get rid of several harmful insects such as aphids, whiteflies, thrips, and mealybugs. Thanks to the chitinase enzyme produced by the earthworms. This enzyme naturally acts as an insect repellant.
- Reduces trash collection fees
What Worms Are Used For Vermicomposting?
Worms are basically found in most soils that support crop growth. However, these worms might not be the best if you want the best results. This is because of their inability to process large amounts of organic wastes and reproduce well in a bin.
The best worms you should consider using are the Eisenia foetida, E. andrei, and Lumbricus rubellis. Under these categories, varieties of worms include red worms, tiger worms, red wigglers, manure worms, and branding worms.
Most gardeners prefer red wigglers because of their ability to ingest organic wastes and reproduce rapidly efficiently. Red wigglers also tend to be a communal type of worms.
They always remain on the surface as they feed.
How to Get Started With Vermicomposting?
Is this the best method of disposing of organic matter and getting organic fertilizer? When you are convinced that you need vermicomposting for its rich benefits you, will likely lookout to set up your system.
Even if you are trying it out for the first time, it will be comfortable when you follow through with the guideline below.
Step 1: Setting Up a Worm Composting Bin
If you release little organic waste from your kitchen, you may go for the simplest worm composter. For indoor worm bins, get a bin usually made from plastic or tote having a lid.
Make holes on the sides and below, excluding the cover. The holes on the sides are vital in allowing ventilation. On the other hand, the holes underneath allow water to drain out.
For an outside worm composting bin, you can go for a simple wood box having gaps between the planks and heavy-duty plastic with holes for good drainage and airflow.
Both indoor worm bin and outdoor work bin must be raised to allow water drainage through the bottom holes.
Step 2: Bedding to Use
You have to fully get your bin ready before adding the worms and the materials. The best bedding you can use for this purpose includes the following?
- Shredded paper
- Shredded cardboard
- Leaves and straw
- Egg cartons
- Some sand soil
When choosing your material, ensure you select the correct material ideal for the season. For instance, avoid bleached paper. If you thought that sand soil is unnecessary, then think again.
Sand soil is crucial in the worms’ digestive tract by adding needed grit.
You are required to add the beddings several times before maturing. This is because, as the worms feed on the materials in the compost, they eat the beddings too.
As a rule of thumb, add more browns as you provide the bin with more food wastes.
Step 3: Adding Worms
This is a crucial part of setting up vermicomposting. Having mentioned the variety of worms available, it's time to visit your nearest worm farm. You can also visit a credible online worm farm to order your preferred worms for your compost.
We love Uncle Jim's Worm Farm for all of our worm needs. You can find them here.
The size of your bin determines the number of worms you can order. For instance, if you have a larger bin of around 40 gallons or more, you might need 1000-2000 worms. On the other hand, you will need at least 500 worms if you have a smaller bin.
With the right conditions and enough feeding of the bin with waste food, the worms’ population may double their number in 90 days. Remember, the worm population will not be uncontrollable. So never worry about having too much in a single bin.
When adding worms into the bin for the first time, try as much as you can to maintain them in the bin, lest they find their way out.
To help keep the little creatures in the bin, make some holes in the beddings, add some food waste and cover the bin with more bedding.
Basically, use a small amount of soil, feed them well and cover them with damp newspaper. Check after one day to see if they are trying to escape.
If you find them near the lid, it signifies a problem with your bin, such as lack of enough oxygen, too many wet conditions, and excess acidic food.
Step 4: Feed the Worm Bin
Finding the right food for your bin is vital. You have to be sure of the foods that the worms like feeding on as well as those that can decompose quickly.
Below are foods you can consider in feeding your young worms.
- Vegetable scraps
- Paper
- Fruits
- Grain
- Eggshells
- Spent coffee grounds
- Tender garden trimmings
Not all foods are right for a worm bin. The following are foods you should avoid.
- Dairy products
- Meat
- Processed foods
- Animal manure
- Too acidic fruits like citrus
Oily foods are highly discouraged due to their potential to bring about odor and pest problems. Acidic fruits like citrus contain a toxic chemical compound that can be harmful to worms.
Step 5: Introducing Proper Vermicomposting Conditions
Best results are earned whenever you put your focus. When you put things right with your worm bin, you will expect to get the best results. After you have added food waste into your bin, you will want to offer proper conditions to encourage the worms to feed on the compost matter.
The main aspects you should always ensure to be available is enough air and moisture. Ensure you keep the worm bin slightly damp but not soggy. Since the earthworms breathe through the skin, it is best to keep the bin ventilated.
You can encourage good air circulation and moisture by stirring your bin whenever you add food waste to the bin. This is also the best time to check the condition of the bin.
If you realize soggy and stingy conditions, add more shredded newspaper, ripped-up cardboard, or leaves and stir them up throughout the bin. On the other hand, if you notice extreme dryness in your worm bin, water it lightly.
Vermicomposting Methods
Here are a few methods you can use for vermicomposting.
Bin Composting
This is the most used method of vermicomposting by small-scale worm farmers. You can acquire a ready-made bin from the stores, recycle used plastic containers or construct one using wood.
Pit Composting
This vermicomposting method, on the other hand, is ideal for large-scale farmers. You can easily prepare the site by making pits with under thatched sheds measuring 2.5 m by 1 m by 0.3 m.
The sides of the shed are recommended to be left open. On the other hand, the pit sides and bottom should be made hard using a wooden mallet.
Pile Composting
Another method best for large-scale vermicomposting is pile composting. This system has a constant height the same as the familiar bins for composting.
However, the sides can be adjusted, with various dimensions of your own preference. You can make the piles on a floor, greenhouse among other porch places.
Final Thoughts
Vermicomposting may be rich in nutrients, but a few gardeners know its importance. A few of the gardeners may also be in a position to prepare one.
In the deep insights above on why vermicomposting is essential, you get an opportunity to know why the composting method matters and a guide on how you can start one.
Meet Jeremy Starke
I've been growing vegetables since I was 12 — over 30 years in the dirt. I share what actually works in my own Zone 6b garden, and what I wish someone had told me when I started.
Zone 6b · North Carolina · Gardening since age 12 Read My Story →Frequently Asked Questions
How does vermicomposting help the environment?
Vermicomposting is an entirely natural process. It employs worms to produce rich nutrients best for plant production without polluting the environment.
Why are worms so important?
Without worms, our entire soil would suffer greatly. They are part of the ecosystem to help recycle and bring more life to the soil. This could impact our food system, cause flooding issues, and create more pollution.
![Best Fertilizer For Pumpkins [Grow Big Guide]](/wp-content/uploads/2021/03/best-fertilizers-for-pumpkins-00.webp)